The former section educated us on why and how to editing the WordPress page. Here we will learn on the menus editing part. Menus are an important element to consider when thinking of website development. The addition of menus on your website will allow the visitors to easily navigate through the website and find the content they are looking for. In order to ensure a responsive design, it is important to have organized menus. WordPress has a menu editing system that is quite easy to understand as well as use.
In this blog post, you will learn how to add and edit a menu on a WordPress website.
A Quick Look of WordPress Menus
Before you get into the details of adding and editing the WordPress menu, you must have a general idea about the WordPress menus. A menu is basically a navigational tool that allows the users to find appropriate content within a website. Menus are important for the overall organization of the website and to enhance user experiences.
Moreover, the right use of menus can also help in improving the SEO ranking of the website. As the WordPress menus offer a pleasant user experience to the visitors, they are more likely to be on your website for longer. This helps in lowering the bounce rate, thereby improving SEO.
How to add a menu on the WordPress Website?
Once you have created a site map or navigational map, it is time to create your menu. If you find difficulty in adding the menus, you can also take the help of a WordPress web designer or a web development company. In order to create a new menu, here are the steps you need to follow.
Step 1: Log in to your WordPress website.
Step 2: Within the WordPress dashboard, go to ‘Appearance’ and select the ‘Menus’ button.
Step 3: To get started, click on the ‘Create New Menu’ link.
Step 4:Assign a name to the Menu.
You will be given an option in order to name your menu. Then you can also select where the menu will appear. However, make sure to keep in mind the location of the menu will vary on the basis of the theme you choose.
Step 5: Select the ‘Create Menu’ button.
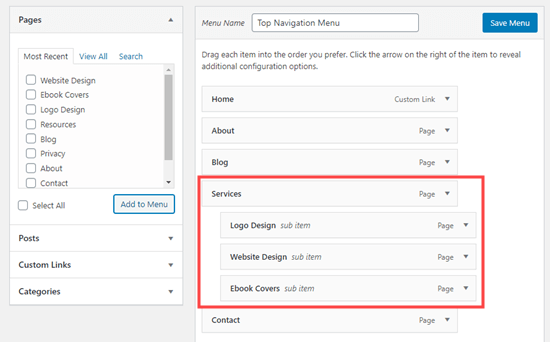
Once you have created the menus, make sure to organize the structure of your menu for the optimum convenience of the visitors. Organizing the menu items is quite simple and easy. All you need to do is simply drag and drop them in the right place.
Step 6:Once finished, click on ‘Save Menu’.
How to Edit a Menu on a WordPress Site?
At times, you will have to edit a menu on the WordPress site. In order to edit the menu item, here are the steps you need to follow.
Step 1:Go to ‘Appearance’ and click on the ‘Menu’ button.
Step 2:The menu will display a list of pages that are present on your menu. In order to edit the menu item, click on the drop-down arrow just next to the specific menu item.
Step 3: Edit the Menu item
Step 4: Once done, click on ‘Save Menu’.
Now that you know the right steps, adding and editing a WordPress menu will be easy for you. To know more, please feel free to contact info@symphony-software.com or 414-218-4644.